If you’ve spent any time using Alteryx by now, you probably have a directory full of useful modules. One of the greatest features about Alteryx is that once you have created and tested a module, you can turn that module into a macro or an analytic app that you can share with others.
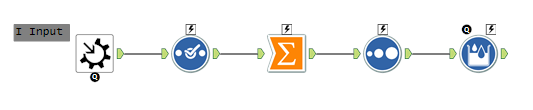
Last week we saw how to use the R Tool to create window functions and calculate a moving z-score for country GDP data. This week, we will see how to take that module and turn it into a macro – a single tool that can be inserted into other modules. I strongly recommend reading the first post before diving into this example because there are several references to processes that may seem out of context otherwise.
There are two important factors to consider when turning a module into a macro. First, we want the macro to be data format agnostic. There will, of course, be restrictions, but a good macro should not require specific field names, column order, etc. Second, we want to design an interface for the user that will show up in the macro properties window when it is placed in the canvas.
Use Dummy Input to Define Generic Fields
Begin macro creation by providing a dummy input. Replace the Input Tool with a Macro Input Tool. In the Properties window, give the Macro Input Tool a set of data that will be input into the Alteryx data stream. This can be from a file or plain text input. This dummy input will provide dummy data to test the macro and define the field types for the macro field map. Make sure, for this example, to check the box to Show Field Map.
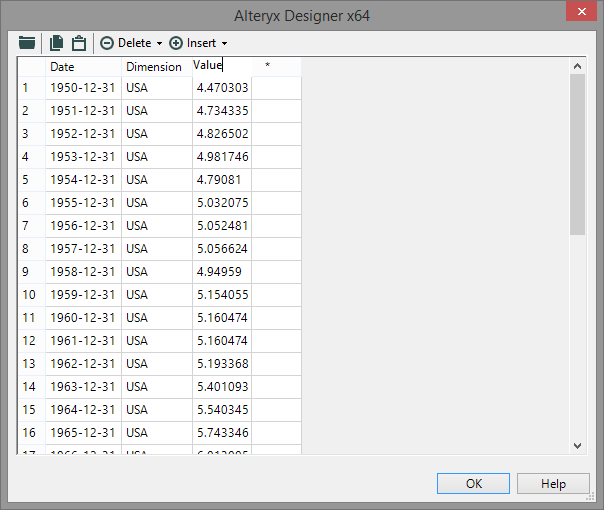
Notice that I have provided only three columns as dummy input for the Macro Input Tool: Date, Dimension and Value. In the example in the previous post, we had a data set with four columns: Date, Continent, Country and GDP. A generic naming convention fulfills the first requirement of macro creation mentioned above. Checking the Show Field Map option fulfills the second requirement allowing the macro user to assign the fields in their data set as the generic Date, Dimension and Value.
Note: When using interface tools in your module, Alteryx sets the default workflow type to Standard Macro. When we are finished with the macro, save it in the .yxmc format instead of .yxmd.
Now that we have changed the names of our inputs, we will want to make sure that we have changed the properties for all other tools in the canvas to represent those changes. Many times, when metadata such as field names are changed on upstream tools, any downstream tools will be pointing to non-existent fields. Any reference to Country should be changed to Dimension, and any reference to GDP should be changed to Value. The Select Tool has a handy option in the properties window to Forget Missing Fields.
Consider a Wide Array of Data Structures
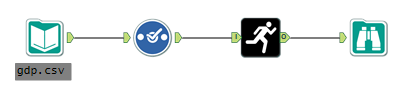
Allowing a user to choose their input dimensions, we want to make sure that Change is correctly calculated across dates. For example, in our sample data set, gdp.csv, there is one yearly entry per country. This means that for a continent, there are several rows for a given date. If a user selects Continent as the grouping field, we would want to sum the GDP for all the countries in a given continent for a given date so that we could correctly calculate percentage change. Add a Summarize Tool as seen below grouping by Date and Dimension with a sum for Value.
Add Icons and Help
With all references to field names changed, our work is mostly done! The rest of the module (now macro) looks the same. To finish, we will add in a macro icon to differentiate our tool and provide an automatic help URL for users. Before we start, make sure the Interface Designer is visible by selecting the option from View -> Show Interface Designer or press Ctrl+Alt+D.

I have provided a custom icon in the data folder in the download below, but you can also choose your own icon. Checking the Help box in the Interface Designer and providing a URL will direct users to the URL when selecting your new tool and pressing F1 for help.
With that done, save your macro and open a new module. Right-click in the canvas and select Insert to navigate to your macro and place it as a tool in your data stream. Notice that we have a field map in the properties window of your new tool.

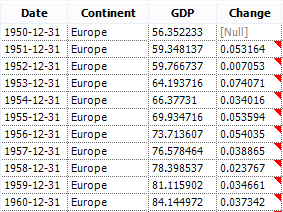
Run the module. Change the Dimension field between Continent and Country to see how the output differs. Run the module again and pay close attention to the output. The Continent and GDP columns have been renamed to Dimension and Value, respectively. You could easily depend on the user to rename the fields with a Select Tool, but that is not consistent with good macro design. Use an Action Tool to create a Reverse Field Map.

Connect the Q output on the bottom of the Macro Input Tool to the Select Tool that is directly upstream of the Macro Output Tool. The Action Tool that appears will have the Reverse Field Map option selected by default. This will ensure that the output fields will be renamed to their original names after processing.
Now our macro is complete. It can be used to calculate a moving z-score on any data set with a Date, Dimension and Value.
Come See Us to Learn More
User input is critical to macros. The more options you provide the user via the interface, the more flexible your macro becomes. These options can become design intensive as you consider all the possible “paths” through the macro.
If you are interested in more complex macro design, download the attached files and see how I provided the option to choose the size of the moving window. Or, if you are at Alteryx Inspire, swing by the InterWorks booth and we can give you a live demonstration!
The Latest
-

Kickstarting Data Innovation in Healthcare
18 April, 2024