
How to create a VPN connection to your office with Windows XP, Vista, 7 or even Macintosh
Before going home:
You will need to verify/acquire the following information from your network administrator:
- The IP address or DNS name of your VPN server _____________________________________
- Your Username that you use to log into the network at work _____________________________________
- Your password !!!!!Don’t write it out, that’s bad security!!!!!
- Full computer name (FQDN) of your desktop at work ______________________________________
- Machine left powered on, power save features disabled
- To get the FQDN of your machine, go to a DOS prompt (Command Prompt)
- Type the following without the quotes “ipconfig /all”, noting the space between the g and /
- At the very top of the screen (you may have to scroll up) look for the following:
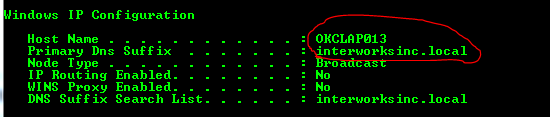
- Simply add the “Host Name” and Primary “Dns Suffix” separated by only a comma, so for the above example, your FQDN would be okclap013.interworksinc.local
- Your Domain (usually the DNS Suffix without “.local” after) _____________________________________
From your home computer
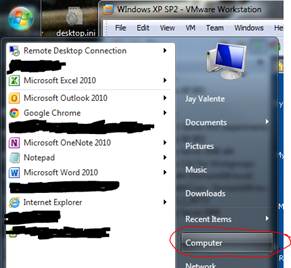
The very first step is to determine what your operating system is. For Windows based machines, the easiest way to determine this is to find your “Computer”, or “My Computer” icon (see examples below). Right-click the icon, and select properties. The resulting screen should indicate what operating system you have (Windows 7 Enterprise, Windows XP Professional, Windows XP Home, etc.)
Windows XP looks like this  , and Windows 7 and Windows Vista look like this
  or like this
 Circled in Red
Now simplly use the part of the guide that corresponds to your operating system
Windows XP (Most versions and Service Packs)
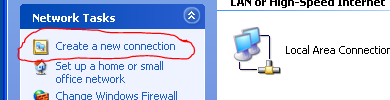
- From your desktop, right click the “My Network Places” icon, and select Properties
- OR
- Click Start->Settings->Control Panel>Network Connections, and if another menu pops after that, right-click Network Connections, and select “Open”
- OR
- Click Start->Settings->Control Panel->Network Connections
If all you see is “Network and Internet Connections” click “Switch to Classic View” on the left menu-bar
- Click “Create a new Connection”
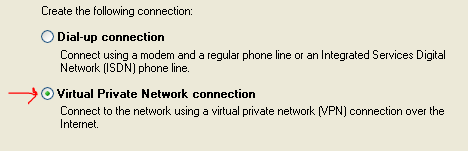
- Click Next then select “Connect to the network at my Workplace”, and click Next
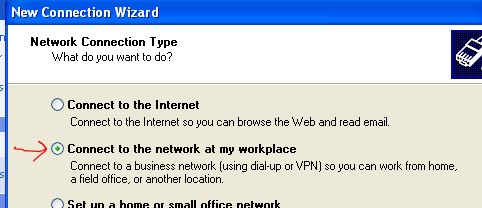
- Select Virtual Private Network connection
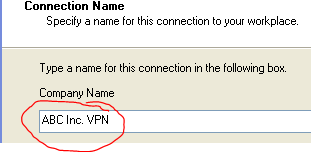
- Next type a name for this connection that describes what it is, like “My Company VPN” or “ABC Inc. VPN”
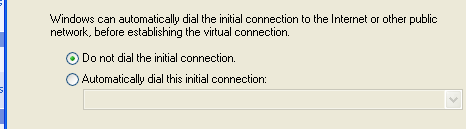
- If this dialog comes up, select the “Do Not dial…” option
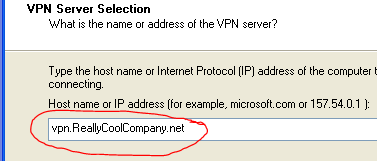
- Now we need to add the IP address of the VPN server that we wrote down up top
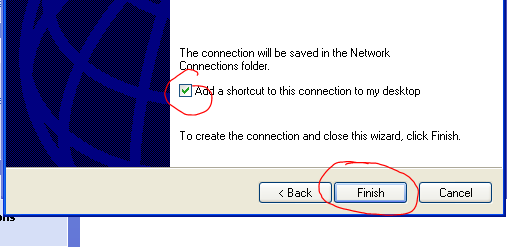
- Select Next, then select the “Add a shortcut…” checkbox, and click finish
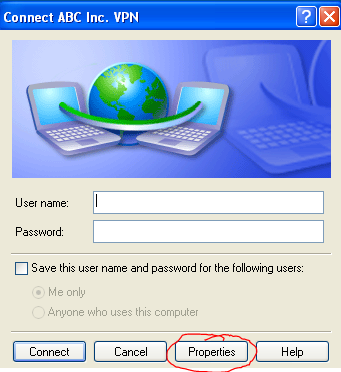
- When the login screen comes up, click Properties
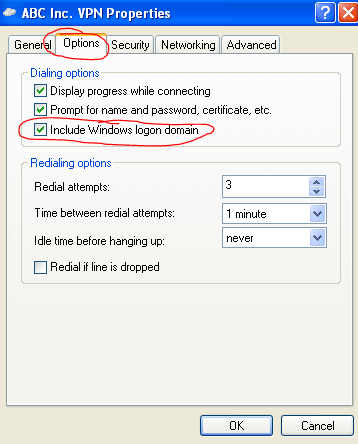
- Change to the Options tab, check the “Include Windows Logon Domain” checkbox, and click OK
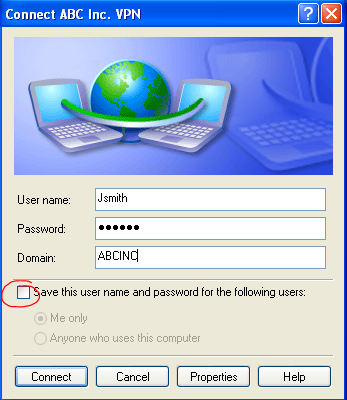
- Now enter your user information including the domain from the top of this form. It is suggested that you do not select the “Save this user name and password …” option, as anyone that has access to the system will be able to connect to the VPN without having to enter a password. Obviously, any mischief would be logged under your username, so youwould still be responsible for any issues.
Windows 7 and Vista (Most versions and Service Packs)
- From your desktop, find the network connection icon. When you mouse-over (hold the mose over without clicking) the icon, it will say something like “Internet access” or “No Internet access”. Depending on whether you use wireless or not, it may look like either of the following images. If you don’t see it, click the little left arrow to show all icons.


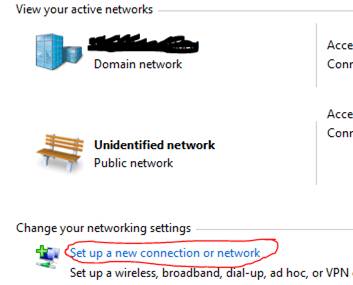
- Click to open “Open Network and Sharing Center”, then select “Set up a new connection or network”
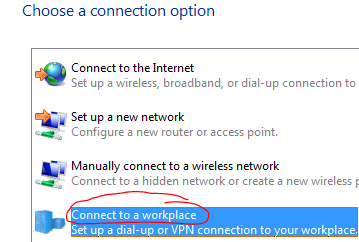
- Select “Connect to a workplace” and click Next, and if it asks if you “want to use a connection you already have?”, select “No, create a new connection”
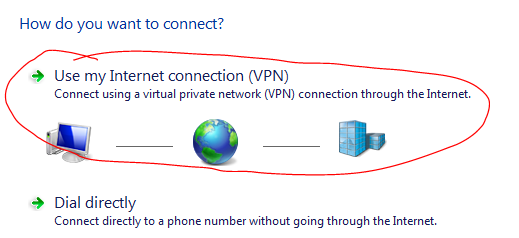
- Select “Use my Internet connection (VPN)
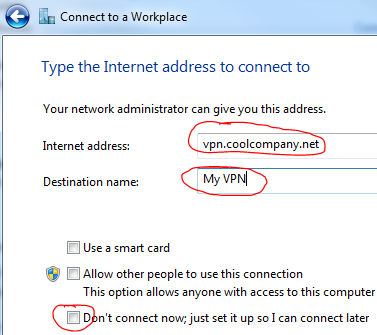
- Enter the VPN address for the “Internet Address”, and enter a name to describe the VPN in “Destination Name”. If you don’t intend to connect immediately, then check the “Don’t connect now…” option
- Enter your user and domain from the top of this sheet. If you are connecting immediately, enter your password, then click “Create”, then “Done”. It is suggested that you do not select the “Remember this password” option, as anyone that has access to the system will be able to connect to the VPN without having to enter a password. Obviously, any mischief would be logged under your username, so you would be responsible for any issues.
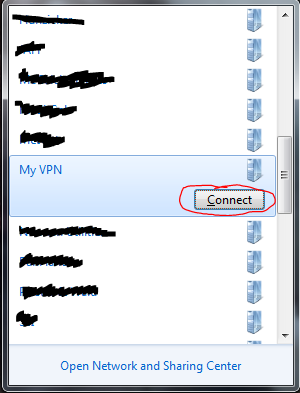
- To connect or disconnect after the VPN has been created, simply click the same icon you did initial;ly to start the process, and you’ll see you VPN listed, click it once to show the “Connect” button, and click “Connect” to connect the VPN. To Disconnect, click the same icon, click the VPN you wish to disconnect, and select “Disconnect”
Macintosh
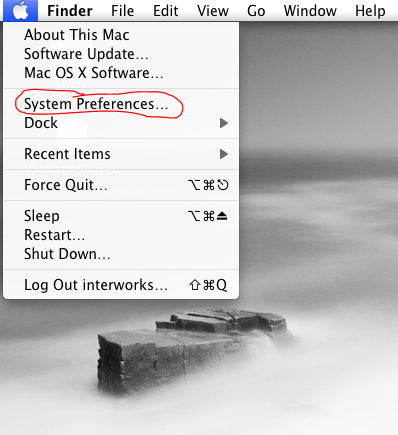
- Click your “Finder” and select Preferences
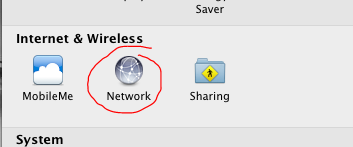
- Double-click the Network icon
- Click the “+” under the network adaptors selection screen
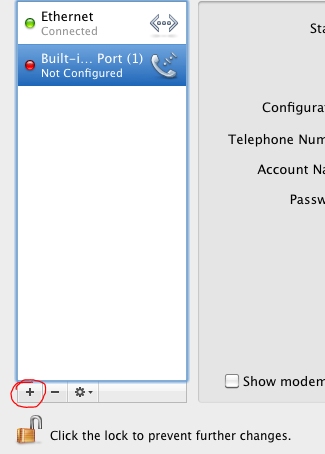
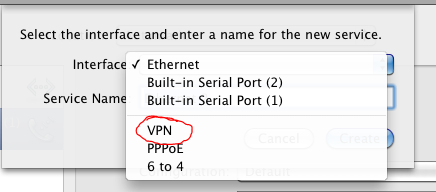
- Click the directional carats by “Interface”, and select “VPN”
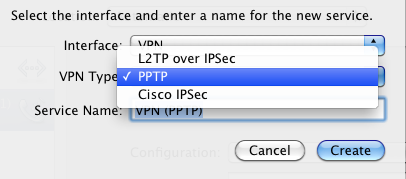
- Click the directional carats by “VPN Type” and select “PPTP”
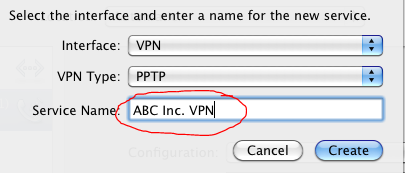
- Enter an easy to understand name in the “Service Name” box
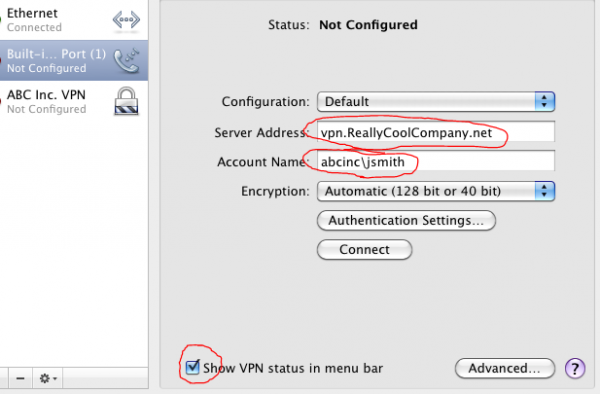
- Enter you VPN server address from the top of this form, your user name, and select the “Show VPN Status…” box as shown
***Note*** When entering your username, you need to enter it as domain/username so if your domain is abcinc, and you username is jsmith, you would enter abcinc/jsmith with no spaces
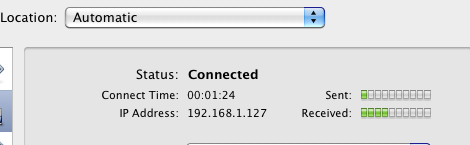
- Click “Connect” and enter your password when prompted, and after a short period of time, you should show as connected as indicated below
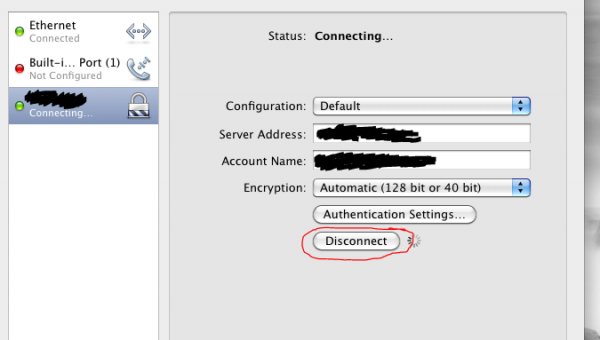
- To disconnect the VPN, simply get back to the “Network” applet, Sewlect the VPN you just created on the left side, and click “Disconnect” on the right side.
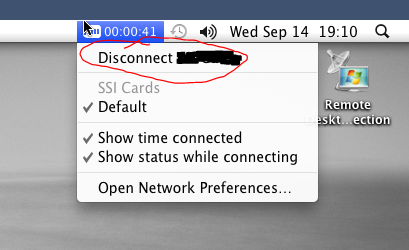
***Note*** Handy tip, you can also disconnect if you selected the “Show VPN Status…” checkbox when setting up without opening network again. Just Click the little “battery looking” icon, and select “Disconnect xxx” where xxx is the name of you VPN connection. Similarly, once you’ve created the VPN connection, you can use this same trick to connect to the VPN with fewer clicks.
The Latest
-

Kickstarting Data Innovation in Healthcare
18 April, 2024