
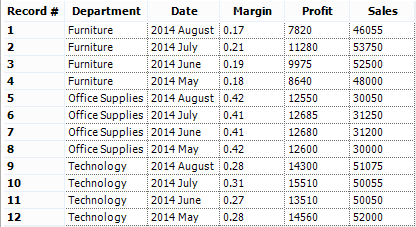
I’ve seen it a dozen times in classes that I have taught. A student is digging Tableau (who doesn’t?) and all of the ways that it can present data. While working through the classroom examples, everything is going smoothly. Then, someone connects to their own data to apply a new technique to an existing report, and it happens. It has happened to me a thousand times. I get an idea for a great visualization, so I go out and collect the appropriate data, connect in Tableau to build a worksheet and there it is again. It’s that elephant in the room, and it’s the layout of your data. Does this look familiar?
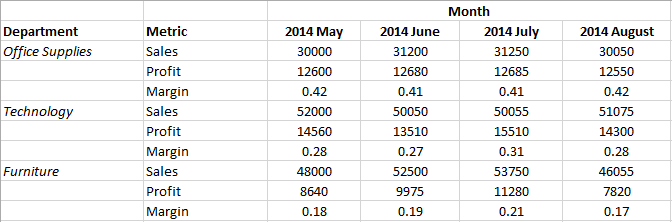
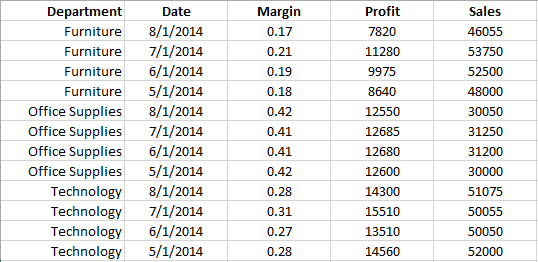
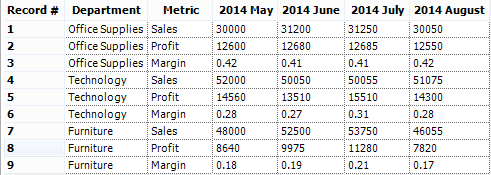
Connect to this sheet in Tableau, and it will be difficult to do much of anything. There will be unnamed fields, a row of data containing field names, several null values for [Department] and a field name for each month. The layout above is great for viewing chronological data in a crosstab, but it isn’t ideal for anything else. As a Tableau whiz, you could probably make this work with a lot of effort. What you really want instead is a table that has [Date], [Sales], [Profit] and [Margin] as one column each. A table like this works effortlessly in Tableau.
Solving the Problem with Alteryx
Transforming the first table into the second is a breeze using Alteryx. That is why you keep hearing about the wonderful relationship between Alteryx and Tableau. In the wake of TC14, let’s talk about optimizing your data layout for visualization in Tableau using Alteryx.
If you aren’t already using Alteryx, I encourage you to download the free trial and follow along with my example. Alteryx Designer is available here.
- Remove the first row of the table with the Month label and use the second row of data as field names
- Populate each row in [Department] with the relevant department name
- Transpose the data so that each [Metric] is a column and that all of the months are in one column called [Date]
- Format [Date] from a string to a date value
NOTE: Keep in mind that using Alteryx is one of many ways to solve this problem. The advantage Alteryx provides is that it automates the process. Another possible solution here would be to use the Tableau Data Reshaper. The beauty of Tableau and data in general is that there are numerous ways to achieve your desired outcome.
Step One
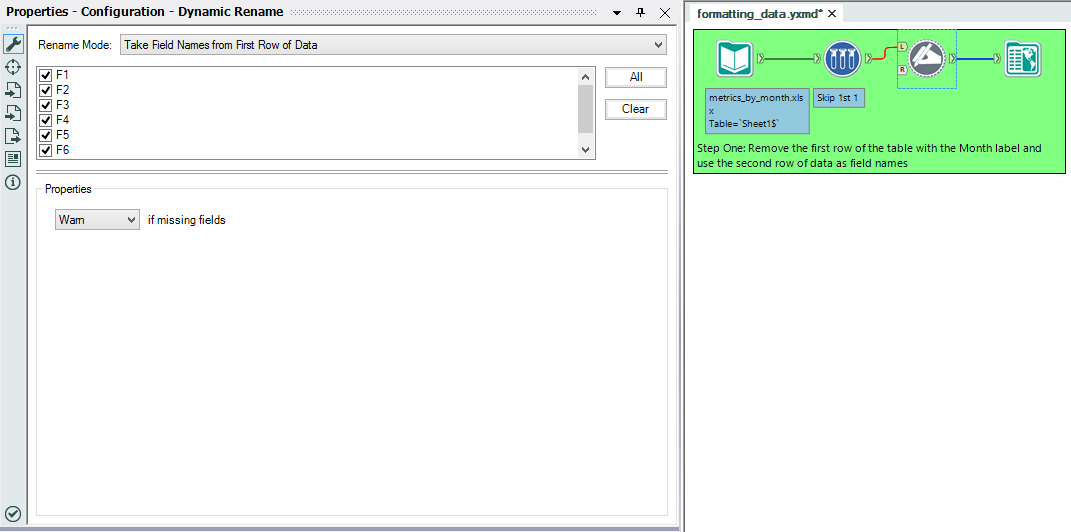
Use an Input Tool to connect to the data: metrics_by_month.xlsx. In the Properties box for the Input Tool, make sure to check the box First Row Contains Data. Done correctly, you should see that the field names are F1-F6. The first row of data should have all null values except Month in F3. Next, use the Sample Tool to remove the first row of data. In the Properties box for the Sample Tool, choose Skip 1st N Records and set N = 1. Now, drag the Dynamic Rename Tool (located in the Developer Toolset) into the module and connect it to the Sample Tool. In the Properties box, make sure that all of the fields F1-F6 are selected and, from the drop-down, set the Rename Mode to Take Field Names from First Row of Data. Add a Browse Tool to Dynamic Rename and run the module to see the output.
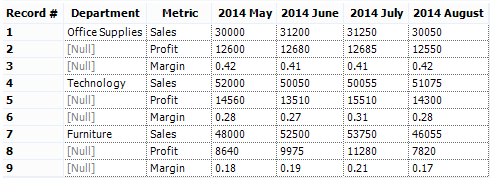
We now need to populate the null values in [Department] with the appropriate values.
Step Two
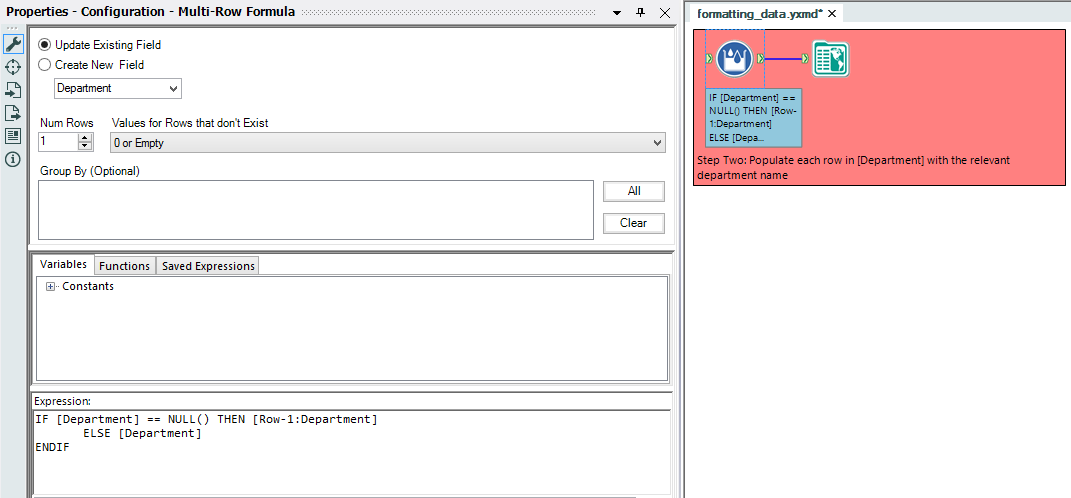
Use a Multi-Row Formula Tool attached to the Dynamic Replace from Step One. In the Properties box, choose Update Existing Field and select [Department] as the field to update. This module will only need to access the previous row, so Num Rows is fine set at 1. In the Expression box, type the following:
IF [Department] == NULL() THEN [Row-1:Department]
ELSE [Department]
ENDIF
This statement checks to see if the current row contains data. If so, it will update [Department] with the entry that is already there. However, if the value is null, Alteryx will update the entry with the entry from the previous row. Add a Browse Tool to Multi-Row Formula and run the module to see the output.
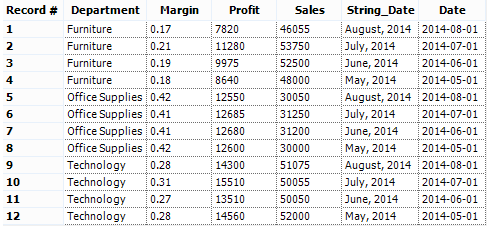
Notice that the nulls in [Department] have been replaced with the relevant values. We now need to transform the table to create a [Sales], [Profit], [Margin] and [Date] column.
Step Three
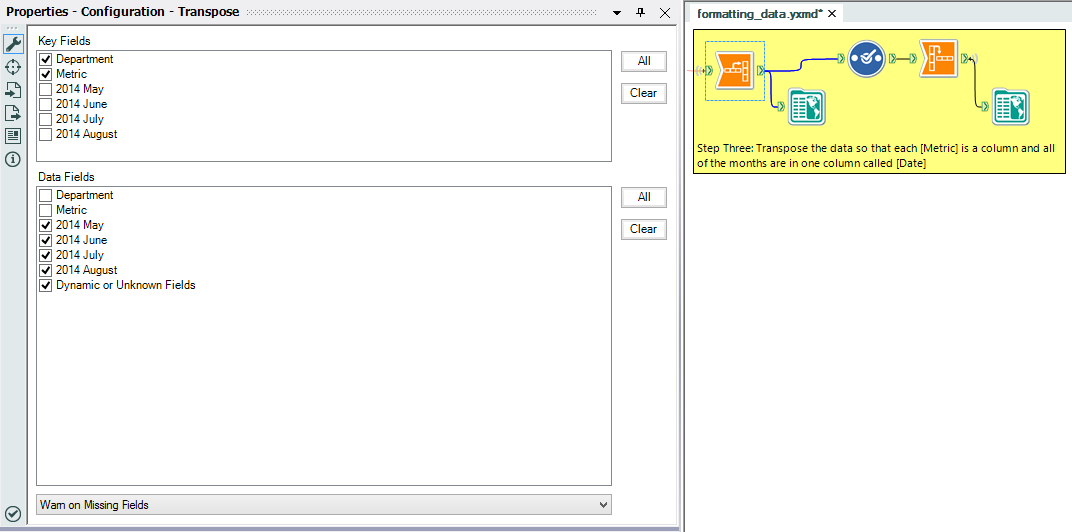
Drag a Transpose Tool (located in Transform Toolset) in the module and attach it to the Multi-Row Formula Tool output from Step Two. In this step, we will need to convert columns to rows and rows to columns. This is called Transposition, and it will require two tools. In Alteryx, the Transpose Tool converts horizontal data into vertical while the Crosstab Tool converts vertical data into horizontal.
In the Transpose Tool Properties window, select [Department] and [Metric] as the Key Fields. Select all other fields as Data Fields. This will keep [Department] and [Metric] as columns and create two new columns with the field names and values selected in Data Fields appended to the Key Fields. Connect a Browse Tool to the Transpose Tool to understand the output better.
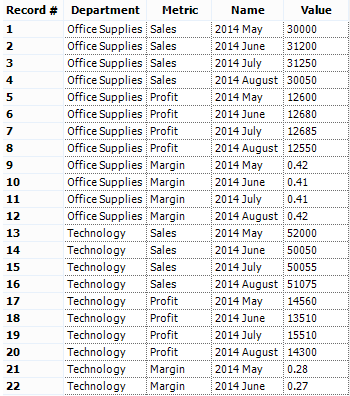
See that [Department] and [Metric] are still columns, but now each month header is now in one column alongside its associated value. We now need to create a column for each entry in [Metric]: Sales, Profit and Margin. For this, we will need to use the Crosstab Tool to turn vertical data into horizontal data.

I’ve used a Select Tool here to rename the column created by the Transpose Tool from [Name] to [Date]. This isn’t necessary, but it helps to identify columns properly. After using the Select Tool, attach a Crosstab Tool. In the Properties window for the Crosstab Tool, select [Department] and [Date] as Grouping Fields. The goal is to create a header for each [Metric], so select it in the Header Field drop-down. The data for [Metric] should come from [Value], so choose that as the Data Field. There is no summarization of values here, so any methodology will work. Add a Browse Tool to Crosstab and run the module to see the output.
The only thing left to do is to reformat [Date] so that it can be used as a date in Tableau.
Step Four
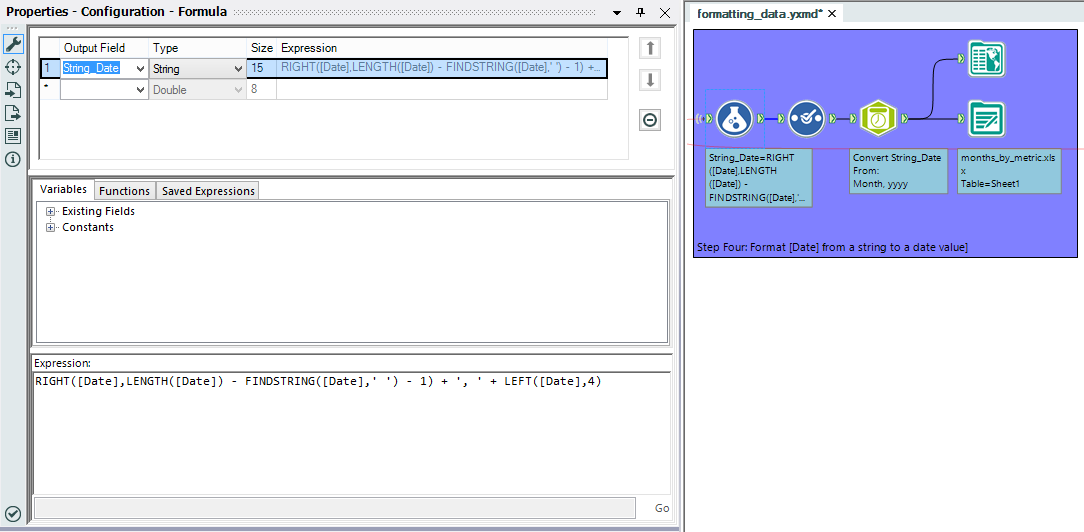
Drag a Formula Tool into the module and connect it to the output from the Crosstab Tool. Using string functions, we can manipulate the [Date] field into a recognized format for the DateTime Tool. The format we will use is MMMM, YYYY. For more information on date formats, visit here.
In the Properties window for the Formula Tool, type in a new field name for the output (I’ve used [String_Date]). Make sure that the string size is appropriate for all values of date in MMMM, YYYY format (15 will work). In the Expression box, type:
RIGHT([Date], LENGTH([Date]) – FINDSTRING([Date],’ ‘) – 1)
+ ‘, ‘
+ LEFT([Date], 4)
This formula will concatenate all of the characters after the space in [Date] (month name), a comma and a space, and the first four characters in [Date] (year). Use a Select Tool to remove the old [Date] from the data stream and a DateTime Tool to convert [String Date] into a date field. Add a Browse Tool to DateTime Tool and run the module to see the output.
Dragging an Output Tool into the module and connecting it to the DateTime Tool will allow you to output the data to a .tde or .xlsx file ready for use in Tableau. Your module should look similar to the picture below when complete.

It took about 15 minutes to optimize the layout of the data for use in Tableau. Changing the layout of data on a server is a major process. Alteryx removes that bottleneck and helps to further the goal of bringing power to the analysts. Create a module, set up an automated process, pull the data from your server and format it how you need without wasting valuable time. Alteryx and Tableau turn data into valuable insight faster than ever before.